The previous Compute Shader post ended with brabble about semaphores, mutexes and other ways to synchronize and avoid conflicts between threads. Ok, but why would one worker has to bother another worker? You would be pissed too if the neighbor shows his head above the fence everyday to interfere with whatever business you’re doing. Respect a man’s privacy! Yet, in Compute Town, there are scenario’s that require cooperation between the elements being executed within a Warp/Wavefront. The last compute shader manuscript, for now. A practical example, on Tiled Deferred Lighting, made by the Pope, in Taiwan, brought to you by MacDonalds.
Deferred Lighting, anno 1725
---------------------------------------------
This post is aimed for the more advanced users. So, if you never wrote a Deferred Renderer or the likes, try that first. But anyway, here a short mind refresher on the traditional Deferred Lighting pipeline:
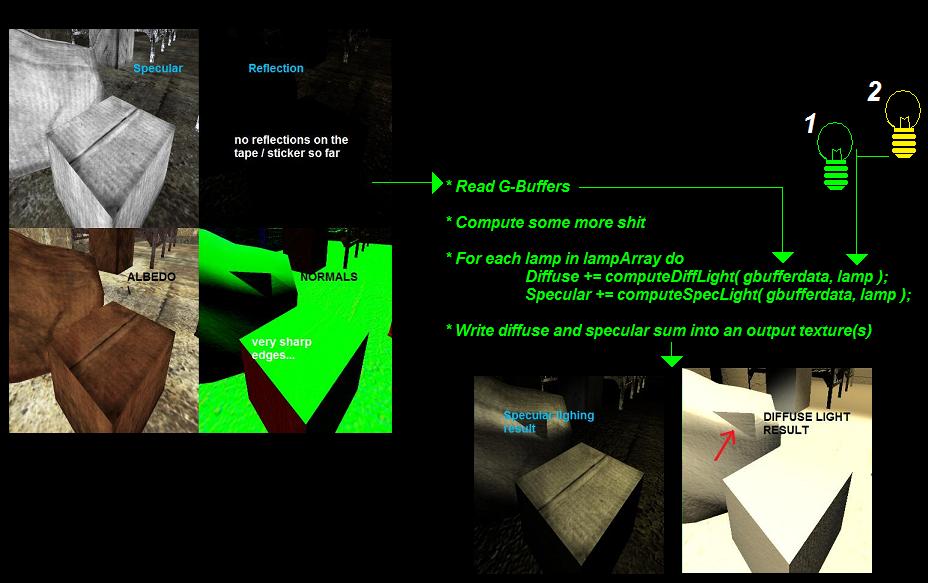
1- Fill (full screen) G-Buffers
With pixel attributes that represent the scenery your camera sees. Attributes such as the 3D position, diffuse/specular color and normal for each pixel.
2- Draw diffuse/specular lighting into another texture buffer(s)
- For each lamp, render a rectangle, cone, sphere or other shape that covers the area that is *potentially* affected by that lamp.
- For all pixels being overlapped by that shape, calculate if the lamp really affects the pixel, and ifso, compute the color results. To do so, use the G-Buffers from step 1.
- Use additive blending to sum up the result of each light, in case a pixel gets affected by multiple lights.
3- Render the scene again, multiply it with the lighting buffers from step 2.
Systems up? Good. Although this approach is easier and faster than traditional forward rendering, there are still two major issues that slow down the process:
- If a pixel is overlapped by 10 lamps, some steps such as reading the G-Buffers and doing some vector calculations, have to be redone 10 times.
- Additive blending, although not slow, is not super fast either.
These two issues are the price you pay for handling each light in a separate pass. It would be nice if we could combine all the lamps into a single pass, so we only have to do the computations once, and do the additive blending internally. Like this:
Thanks to uniform buffers and such, making an array of lights isn’t too hard. But… there is one stinky catch. How do you know which lamps from the array apply on a particular pixel? If you have 100 active lights scattered on your screen, it doesn’t mean each pixel should loop through all 100 lamps. Well you can do … but it’s stupid.
Deferred Lighting, anno now --> Tiled Deferred Lighting
---------------------------------------------
Did you see the Batman signal projected at the clouds? That means a Compute Shader is needed. We can do all the testing and lighting in a single program. The idea is pretty much the same as illustrated in the Rick++ code above, except that we also test which lights should be involved, and which can be skipped for a small region of pixels. After all, a local light in the top left corner of the screen shouldn’t lay his dirty hands on pixels in the opposite screen corner. Since this testing step is quite expensive, we don’t cull the lights for each pixel, but per “tile” (hence the name).

Tower22 is progressing very well
Technically speaking, all pixels within a Warp/Workgroup can form a square tile together (32x32 pixels for example). Instead of testing for each individual pixel which lights affect it, we do it per tile. And since we have 32x32 (or more) pixels within a tile, we can nicely divide the work. For example, if each pixel just tests a single light, we can perform 1024(32x32) checks simultaneously. Oh yeah, parallel working remember? All pixels within the tile are executed simultaneously, so instead of 1 pixel doing all the work, kick their lazy asses of the couch and divide the work.
That sounds logical, but if you are like me, you are probably already trying to figure out how you would code that in Cg, HLSL, GLSL or whatever language… coming to the conclusion you don’t have a clue how to let pixels cooperate. Well, that’s one of the major differences with common shaders and Compute Shaders such as CUDA or OpenCL. Let me explain the “Tiled Deferred Lighting” (OpenCL) compute shader step by step. First, an overview of all steps performed within this (single!) shader:
1- Setup tasks to run
2- Attach in- and output buffers to CS (parameter setup)
3- In the CS, let each task read the pixel position (and maybe normal) from the G-Buffers
4- Make a bounding box for each tile
5- Test by which lamps a tile is affected (thus test per tile, not per pixel!)
6- Apply the lamps from #5 on the tile pixels. Sum up the results
7- Write the results to the two output light textures
******* 1. Setup
Before we can drive, we first need to start the car of course. Same for launching Compute Shaders. This is a bit different than you may be used to with OpenGL for example, where you activate a shader (change the state-machine) so all upcoming drawing calls make use of it. Remember, Compute shaders have nothing to do with GL/DX, so neither do they have to be executed within a GL/DX context.
Well, as for Deferred Rendering, we typically render the results in one or two full-screen textures. Let’s say your screen resolution was a whopping 1024 x 768. That means we have 786.432 pixels to calculate. In other words, the Compute Shader has to run 786.432 tasks, where each task calculated the lighting and writes the output into those two textures.
We give these tasks to the GPU, and to make real advantage of the hardware, we make Warps/Wavefronts (or called “Workgroups” in OpenCL) of 16x16, or 32x32 tasks (or whatever you prefer). Remember, tasks within a Warp can run simultaneously. Each group would draw one tile on the screen. Btw, one note, keep in mind that in OpenCL, the total number of tasks must be dividable through the workgroup size. 1024 / 32 = 32 = ok. 768 / 32 = 24 = ok. If the outcome wasn’t a rounded number, you may need to adjust either the workgroup size, or the total amount of tasks.
******* 2. Attach in- and output buffers
I said Compute Shaders have nothing to do with your graphics API (let’s assume OpenGL), but that is not entirely true of course. Our CS needs to read G-Buffers that were produced earlier via common ways, and also the output must be inside a texture that GL understands. Luckily, this is possible via Interop Buffers. You can share GL vertex, uniform and texture buffers with a CS so you can directly read or write in them. Phew.
Besides textures, we also need some sort of buffer that tells about all the (active) lights in the scene, so the CS can loop through them. I would make arrays of structs for pointlights, spotlights, and so on. Those structs then contain the light colors, matrices, shadowMap coordinates, et cetera. I store all shadowMaps within one bigger texture btw. To illustrate what you may need, here the kernel declaration in the CS shader:
__kernel void tiledDeferredLighting( const float camX,  const float camY,  const float camZ,
  __global struct shUBO_Lights* lights,
  __read_only image2d_t gBuf_Specular,
  __read_only image2d_t gBuf_Normal,
  __read_only image2d_t gBuf_WorldPos,

  __read_only image2d_t iTexShadowMapsSpot, // all spot shadowMaps
  __write_only image2d_t oTexDiffuse, // Diffuse output
  __write_only image2d_t oTexSpecular // Specular output
  )
{
   …Magic Johnson…
}
******* 3. Read G-Buffers
Diving into the G-Spot, eh, CS code now. OpenCL can read 1D, 2D and 3D textures, using linear or integer coordinates, and eventually with mipmapping. The code is less handy compared to your common shaders, but it works. One slight difference is that you have to make texture-coordinates yourself now. This can be done by looking at the local- or global IDs that are given for each task. If you run tasks as a 2D array spread over the screen, the ID’s will correspond with (integer) pixel coordinates:
  int2 globalID = (int2)( get_global_id(0), get_global_id(1) );
  int2 localID = (int2)( get_local_id(0), get_local_id(1) );
  int2 texcoord = globalID;

  // Get G-Buffer data
  const sampler_t samplerG = CLK_NORMALIZED_COORDS_FALSE| // <- use integer coords instead of 0..1
              CLK_ADDRESS_REPEAT         | //
                     CLK_FILTER_NEAREST;    // <- filtering method

  float4 gWorldPos = read_imagef( gBuf_WorldPos , samplerG, texcoord );
  ...
The global ID is the absolute number of a task. A local ID is the same, but within a Warp/Wavefront/Tile/Workgroup or whatever the hell you like to call them.
******* 4. Make a bounding box for each tile
In the setup from above, we made 32x32 tiles. Instead of letting each pixel test by which lights it would be affected, we do it per tile. Do the math, either test 1024 x 768 = 786.432 times, or {1024 x 768} / {32/32} = 768
E.Honda wins. If we know a bounding box, we can do a simple test to see if a light intersects the contents of a tile (and thus affects 1 or more of the pixels within). As an extra test, I also compute the average normal for each tile. If the pixel normals vary a lot within the tile, it has no use. But often you'll be looking at a relative flat piece where all pixels face the same direction more or less. So if the average normal is useful, we can also exclude lights that shine from the wrong direction.

Now, how to find the furthest or closest pixel within a tile? Let each pixel read a whole rectangle from a Z buffer? No, no, no. Damn no. This is where cooperation between tasks becomes useful. Let each task just read a single pixel, as usual. But use shared variables and a “min” & “max” function. Each task would overwrite the highest value in case it found a further pixel. However… Remember all the thread drama from previous post? Since the tasks run simultaneously, you can’t just do “furthestPixel = max( furthestPixel, myValue );”. Use an “atomic” operation instead. This ensures only 1 task will update the variable at a time:
  __local float minZ; // “__local” tells the variable is shared with all tasks within the tile
  __local float maxZ;

  ... read depth buffer

  minZ = atomic_min( minz, pixel.z );
  maxZ = atomic_max( minz, pixel.z );

  // Notice that these atomic operations may slow down the progress as a whole, as other tasks
  // within the tile need to wait (shortly). Minimize the atomic operations, or if it's really causing
  // problems, consider doing the testing on a lower resolution buffer (= less tasks).
The same tricks can be applied to find out whether the all the normals within a tile are more or less the same. Ifso, you can skip lights that shine from the wrong direction. You could for example sum up all normals, and then calculate the average normal and see if it’s not too different from the min/max normals.
Before averaging, you may want to ensure all tasks are done summing up. And also, if you don’t want this whole normal-check, you still have to wait till all tasks are done before you can proceed with the next step. To do so, use a barrier:
........barrier( CLK_LOCAL_MEM_FENCE );
******* 5. Test which lamps affect a tile
In the previous step we found some values to make a bounding box, and eventually an average normal. Now let's see which lights intersect, and can potentially lit them (notice we don't test shadows yet). Although the test is relative cheap, again we have to cooperate instead of letting 1 task looping through all lights and the other pixels jerking themselves off. For example, give each pixel 1 light to test, using its local index (see #3). So if there are 50 lamps, pixel0..49 will test... and the remaining ones will jerk off.
In practice, it's a bit more complicated as we have several types of lights. Mainly spotlights, pointlights, and huge sources such as the sun. So, use your creativity. The point is, spread the work! If a light passes the test, it has to be added to a list. If you know threading, you also know that dealing with lists can be tricky. Consider this:

In higher programming languages, we can usually lock a list, add or delete an element, then unlock it again. But we're working in the abyss here. Luckily, its fairly easy to achieve the same. Just use
__local int arrayIndexCounter = 0;
__local struct lights[MAX];
...
if ( lightPassed )
{
    int n = atomic_add( arrayIndexCounter );
    lights[n] = myTestedLamp;
}
The atomic operation ensures n will be filled with a proper value. Btw, there are also faster hardware counters for this purpose I believe, but I haven't tried them yet.
******* 6 & 7 Lighting
Showtime. You found all the lights and placed them in array(s). Now let each pixel loop through all these lights and apply them on itself. Where traditional Deferred Lighting would need additive blends, we can just sum lights with the good old + operator.
This step does pretty much the same as a normal lighting pixel shader, except that it does all the lights at once in a loop. The bad news is that you may have to (re)write quite some code in OpenCL for all the different types of lights. So, do it smart and write it as functions you could reuse in some possible future CL program.
The results simply get written back into a texture, in a similar fashion as we readed pixels in step #3.
----------------------------------------------------------
Step 4 and 5, where multiple pixels share and contribute to the same data, is something that wouldn't be possible with ordinary shaders. And although you may not be in the need for such tricks soon, there are certainly scenario's that can benefit from this, or wouldn't even be possible without Compute Shaders (making octrees on the GPU for example). For that reason, it's good to step inside the world of Compute Shaders when you have a chance. Setting up a CS and launching it is childsplay, as the OpenCL API is very small compared to OpenGL. Finding good reasons to use a CS on the other hand is another story. It requires creativity, and a good understanding of when & what can benefit from CS features that aren't possible with common shaders. To be honest, I haven't implemented any CS into Tower22 yet. Either I could do without, or my older laptop card didn't support some of the (atomic) operations that make a technique like Tiled Deferred Lighting interesting.
Well, just download a demo and see for yourself. As usual, the best practice comes from trying yourself and looking at the big boys. Once you sucessfully filled some buffers, you will also learn that a CS can be used beyond 3D graphics and games. Maybe it will become useful one day!

I couldn't make a post without showing at least 1 interesting image. Or at least... I'm a bit proud of it as this is the first time I kinda sucessfully used the Wacom tablet, not drawing like a toddler. Other than that, it's nothing more than a conceptual monster that probably won't make it to the final rounds ;)
Thanks for this article series on compute shaders, it's been an enjoyable read. I think I'll have to try this stuff myself now as well :)
ReplyDeleteThanks, I hope it was useful. And otherwise at least enjoyable indeed hehe
ReplyDeleteVery interesting post! But how do you handle transparency in this scenario?
ReplyDeleteDidn't really think of that, but by default, translucent (not necessarily transparent) surfaces aren't included in any Deferred Rendering/Lighting procedure anyway. Usually stuff like glass, liquids or jelly are handled afterwards with old fashioned forward lighting.
ReplyDeleteBe aware that quite a lot of transparent surfaces such as plant leafs or metal fences can still be included like opaque surfaces with the help of alpha testing. Either a pixel is completely visible, or completely not. That may give some nasty jagged edges, but then again textures resolutions are so high these days that you don't quickly notice. And otherwise there are some anti-aliasing techniques for that.