Fog. Got to hate it
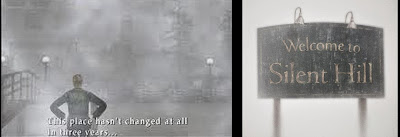
Nothing changed at all? Really? Nevertheless, Silent Hill is one of the few games where the fog is acceptable. Because it adds up to the unreal horrible athmosphere.
Didn't I just mention in the "Goldeneye" review, how fog ruined the looks of many N64 / PSX era games? The military uses smoke grenades to create a coverage curtain. Magicians use spotlights & fog to keep the audience focussed at the act instead of the background. Games used fog to mask their incapability’s to render more than a few thousand polygons. The world literally ended after ~50 meters or even less. Those days are over fortunately, but that doesn’t mean fog completely disappeared.
What the heck is fog anyway? Why do we see fog, or actually can't see shit because of fog? Well, pretty simple. The air is filled with microscopic water droplets that reflect/refract light. A single droplet won't hide the car driving 50 meters in front of you, but a huge quantity does. The same kind of effect is reached when blowing smoke or a gas substance into a room. Tiny particles block sight. If you don't believe me, buy 3 packs of cigarettes and start steaming in your bedroom. Don't forget to open the window after the experiment so your mom won't notice.
So, despite the harm it did too older games, fog is a natural thing. And thus, we want it in games. But... either to apply on much greater distances, or too simulate very local volumetric effects. Traditional fog is nothing more than a colour that would take over as the depth increases. But when looking at real fog, clouds, smoke, smog or other gassy substances, you'll notice variations. It seems to be thicker just above the water. Ghastly stretched strings of fog slowly slide above the grass on a fresh early morning. You see, fog can be quite beautiful actually, just as long you avoid the old traditional formula to generate linear depth-fog as much as possible.

Our Dutch landscapes aren't known for spectacular nature phenomena. But my daily bicycle ride to work gets an extra touch when greeting my black & white grass eating friends in the morning dawn. Beauty is in the little things.
Making fog... Easier said than done. Everyone who programmed some graphics or made 3D scenes in whatever program / game-engine, probably knows how hard semi-transparent volumes of "stuff" can be. To begin with, they are sort of shapeless, or at least morph into anything. So just making a half-transparent 3D mesh is not going to work by default. How the hell would you model strings of fog? Or a campfire with smoke? A long time ago we invented "sprites" for that; billboards with an (animated) texture that would always face the camera. But just having a single flat plate with an animated campfire picture on it, would still look dull from nearby. You immediately notice its flat once you see the intersection lines.
Nice, a little candle flame!.... A naughty little FLAT candle flame that is, sigh.
Pump up the volume
We need some punch, some volume. But you can't do that with a single sprite… How about using many more (very small) sprites? And so the name "particle" was born in the games industry. Although it's not exactly the same as the ultra-microscopic stuff CERN launches to create new dimensions with. In games, particles are typically small but still viewable. A patch of smoke, a raindrop, or a falling tree leaf. One particle is still shapeless, but combining a whole bunch of them makes a 3D volume. Sort of.
The reason why we won't just use real-life microscopic particles, is because it would take at least millions of them to render the slightest gassy fart. We can render quite a lot of them, but not THAT much. So we up-scaled them. Yet, speed is still an issue. To fill the whole room with Zyklon B, you still need (hundred)thousands of particles. Or, you'll upscale the particles even further. More particles = performance loss. But less and larger particles on the other hand will reveal the flattish 2D look again. Using "Soft-particles" (meaning you gently fade out particle pixels that almost intersect solid geometry) reduces the damage, but only to some extent. Also, when rendering a bunch of larger particles in a row, there is a big chance of overdraw and performance loss. Finding the good balance between quantity and size is important.
In an ideal situation, we can render more (smaller) particles. But at some point, you'll hit the ceiling. The memory can't carry an infinite amount of particles, and updating + drawing all of them is also a pain. Especially now that the rendering of opaque 3D objects got more and more tense. Engines and games brag about "200 lights in this level!", "more than 30 dynamic shadows active!". It seems artists just love to spray light all over the place. Obviously, particles should catch light like any other object as well. But if there were dozens of (shadow-casting) lights, ten-thousands of particles, and a video-card that already sweats when drawing multiple layers of unlitten particles in a row? Then how would you properly do that?
When something should show up "volumetric", it should also obey the rules of light. Rendering smoke that gives the middle finger to your lights, will look very artificial. And flat. And stupid. To spice things up big time, you can light your particle pixels. If it works for a brick wall... then why not far particles? Damn right homie.
But then you quickly realize that the performance was crushed again. And another practical problem; how & which lights to apply on each particle anyway? If you have a "200 lights in this level!" situation, you'll get a hard time letting your particle loop through all of them.
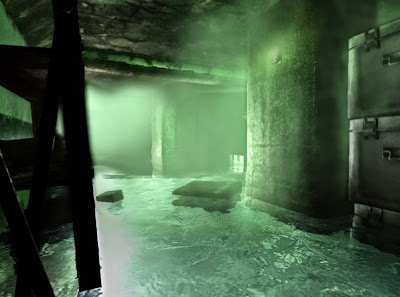
In the 2011 T22 demo, each billbiard(sprite) pixel would test if the nearby lamp volumes would affect it. Pretty nice results, but too slow for comfort. Most of my particle attempts just never felt right.
Deferred Particle Lighting
I wish it was my invention, but it isn't. Doing deferred lighting for the last 8 years, the answer was in front of us all the time. But instead we tried all kinds of difficult hacks that felt uncomfortable. Fortunately someone pointed me to this Lords of the fallen paper. Don't know if they were the first -probably not- but at least they were kind enough to explain "Deferred lighting for particles" in plain English. It's really pretty simple, if you have a solid foundation with deferred lighting and GPU driven particles at least. And, before I sound too euphoric, Deferred Particle Lighting is not the Final-Solution either. It's a cheap and very efficient ointment, but not for each and every malady. Got it? Then here we go.
When doing particles on the GPU (and if you don't do that already, please do), you can depict them as points. Each particle would be a single point, a bunch of vertex attributes such as a position, colour(multiplier), size, velocity and state. And very important for this technique, is also an unique ID (0,1,2,...n). Typically you could write those attributes into a struct that consumes 64 to 128 bytes. Next, a Compute-Shader can be used to evaluate the physics of each particle. Apply gravity, let them bounce on the floor, or just randomly zoom around like stinky flies. Cool thing about Compute-Shaders btw, is that you can even let particles follow each other. Unlike ordinary shaders, you can access the data of other "neighbour" particles in a Compute-Shader. The CS accesses data from the particle array, which is basically a VBO (Vertex Buffer Object), does some math, and writes the results back into it.
But hey, didn't you tell a particle was a sprite or billboard? Thus a camera-facing quad instead of a single point? Yes it is, but you don't have to treat them as quads initially. Here is where the Geometry shader becomes handy. In a first stage, you update the physics for all particles. In a second stage, you actually render them. As an array of points. But between the Vertex- and Fragment shader, there is a Geometry shader that makes a quad out of a point. Like Bazoo the clown inflating balloons before passing them over to the kids. Tadaa!

The story of Benjamin Button.
So far, we didn't mention light though. When walking right through a cloud of particles, we may quickly render millions of pixels (that overlap each other). Lighting each pixel would be a (too) heavy task. But the amount of particle-points, the origin of each particle sprite, is much smaller. Here you are talking about magnitudes of thousands, not millions. So what if we would just calculate the light for each particle-point? Thus basically per-Vertex lighting?
And how about if we can do that the "Deferred lighting" way? Instead of looping through all potential lights for each particle, we do a reverse approach. Like traditional deferred lighting, we first splat all the particles into a 2D texture, or G-Buffer. Then we'll render each light on top of it, using additive blending. I'll explain the steps.
Step 1: Making the G-spot
To light stuff up, we need to know at least a position and normal:
 Diffuse light = max( 0, dot( lightVector, surface.normal )) * light.color * attenuation
 where lightVector = normalize( light.position - surface.position );
 where attenuation = someFalloffdistance formula, depending on the light.range
For particles, we only need to know their positions really, as their normals can be guessed; they face towards the camera. Besides, translucent particles let light through, so maybe you don't even have to care about directions really, or reduce the effect of it at least.
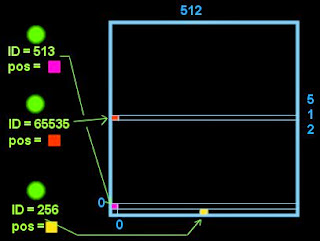
This means we'll need to put all particle positions into a G-Buffer (or just a 2D target texture). A 512x512 texture would provide space for 262.144 particles. Not enough? Try 1024x512 or 1024x1024 then. Ok, now where to render each particle on this canvas? The location doesn't matter, just as long each particle gets its own very unique place that no other particle can override. That's why you should add an unique ID number to each particle. Besides for these rasterizing purposes, an ID is also nice to generate pseudo-random data in your other shaders. Anyway. Using the ID you could make target plot-coordinates like this:
 // Vertex Shader that plots the particle data onto a G-Buffer
 const float TEXW = 1024.f; // G-Buffer dimensions
 const float TEXH = 1024.f;

  // Calculate plot coordinates
  float ID = round(particle.ID); // Be careful with floating point artifacts, or your ID might toggle between 2 numbers!
  float iy = floor( ID / TEXW );
  float ix = floor( ID - (iy * TEXW) );
  // Convert to -1..+1 range (0,0 = center of target buffer)
   out.position.x = ((ix * 2.f) - TEXW) / TEXW;
   out.position.y = ((iy * 2.f) - TEXH) / TEXH;

 // Fragment Shader
  out.color.rgb = particle.worldPosition.xyz;
  out.color.a = 1.f; // whatever
Here you go. A rather ugly cryptic texture filled with particle positions. Oh, and don't forget to make your target textures/G-Buffers or whatever you like to call them, at least 16bit floating point. You probably won't need super accuracy, but 8bits won't do.
Step 2: Let there be light, deferred style
With common deferred lighting, the second step is to draw light volumes (spheres, cones, cubes) "on top" of the G-Buffers. The light volume would read the data it needs (position or depth, normal, ...) from the G-Buffers, and poop out a litten pixel. Because light volumes can intersect and overlap each other, additive blending should be used to sum up light. This is finally stored back into a diffuse- and specular texture. Then later on these textures can be used again when rendering all bits together.
Same thing here, but with some slight adjustments. Simplifications really, don't worry. We render the results to a Light-Texture, equally sized to the particle-position G-Buffer we made in step 1. Instead of a volume, we render a screen-filling quad for each light. This is because the output from step 1 doesn't represent a 3D scene at all. A particle could be anywhere on the canvas. My English isn't perfect, but I believe that is what they call an "Interleaved texture". So, to make sure we don't miss anybody, just render a quad that covers the whole canvas.
Some more adjustments; We need to derive the normal from the particlePosition-to-camera vector, and/or apply translucency. Does it really matter if you light your particle from the front, behind, left or right? But if you do care, you can consider storing a translucency or "opaqueness" factor into the alpha channel of the G-Buffer we made in step 1. Finally, we can forget about specular light, and other complicated tricks such as BRDF's. Yeah.
Oh, I should note one more thing. You can test if your particle is shaded or not, in case you use shadowMaps. But please make a smooth transition then (soft edges, radiance shadowMapping, ...). Since you only calculate the incoming light for the centre-position of your particle, it may suddenly pop from shaded to unshaded or vice-versa if the particle moves around. This is one major disadvantage of this technique, but it can at least be reduced by having soft-edges in your shadowMaps, using more & smaller particles, and/or reduce movement of your particles.
Step 3: Rendering the particles
Step one and two can happen somewhere behind the scenes. Whatever suits you. But at some point you'll have to render the little bastards. Well, this is cheap. Either your fragment- or vertex shader, can grab its shot of light in the "light-texture" (step2), using the same ID we used in step 1 to calculate the plot coordinates. Careful that reading from the exact right spot might be a bit tricky though. Maybe you want to disable linear filtering and use NEAREST sampling on your lighting-texture. And depending on which shader language & instructions you use, you may have to add half-a pixel size to access the right location. This is how I did it in Cg:
 const float TEXW = 1024.f;  // Light texture dimensions
 const float TEXH =  512.f;
 const float HALFX = 0.5f / TEXW;  // Half pixel size
 const float HALFY = 0.5f / TEXH;

  float ID = round(particle.ID);
  float iy = floor( ID / TEXW );
  float ix = floor( ID - (iy * TEXW) );
  // Convert to 0..+1 range, half texel offset
  float2 defTexUV;
   defTexUV.x = (ix / TEXW) + HALFX;
   defTexUV.y = (iy / TEXH) + HALFY;
   diffuseLight = tex2D( particleLighting, defTexUV ).rgb;
There you go, diffuseLight. Full of vitamin-A coming from ALL your scene lamps, including vitamin S(hadow) as well. Hence it could even include ambient light (see below). Now it's easy to see where the speed gain comes from. Doing this (eventually just once in the vertex-shader), or looping through lamps and doing fuzzy light-math for each billboard pixel? As said, being vertex-litten, it's not pixel perfect and therefore somewhat inaccurate. But all in all, a cheap and effective trick!
Ambient light
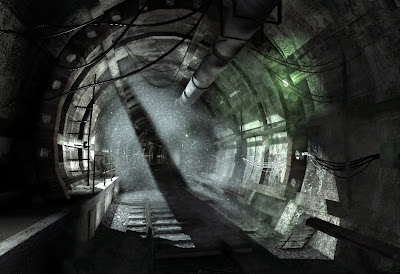
When just doing deferred lighting, thus using direct lighting only, your particles will appear black once they are out of range. In Tower22, I use an "Ambient-Probe-Grid". Before starting step2, I "clean" the buffer by rendering ambient light into it first. Each particle would sample its ambient portion via this probe-grid, using its particle world position. If that goes beyond your lighting system, then you could at least use an overall ambient colour to clean the buffer with, instead of just making it black. This gives a base colour to all of your particles. Furthermore I advice to have a customizable colour multiplier that the artist can configure for each particle generator. Smart code or not, you still can’t fully rely on machines here.
Into the blender; Premultiplied Alpha Blending
A bit outside the scope of this article, but important nevertheless. Particles, and alpha-transparent objects in general, are notorious for sorting problems. If surfaceA is IN FRONT of surfaceB, but gets rendered BEFORE surface B, then surface may get masked where surfaceA is... huh?
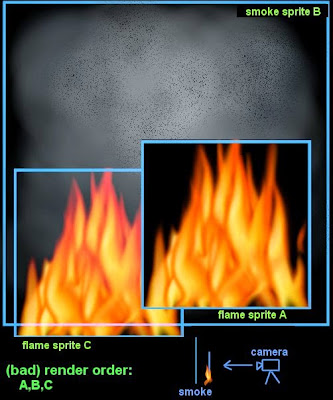
FlameA makes a "hole" in background smoke spriteB, while other flameC doesn't. This is because flameA gets rendered first, while it should be rendered last. Also the transparent pixels of the flame, will claim a position in the depth buffer. The smoke sprite behind it will be partially masked, as it thinks the flameA pixels are occluding, having a lower depth value.
Particle clouds with "random" sorting canget ugly quickly if this happens. There are two remedies; sort your shit, or use a blending method that doesn't require Alpha-Testing. The first method means you'll have to re-arrange the rendering order. Audience in the background gets a ticket first, audience in the front gets rendered last. Hence the name "Depth-Sorting". I must admit I never really did this (properly), so I can't give golden advices here. Except that sorting sucks and can eat precious time, or just isn't possible in same situations. Fortunately, you actually can swap places in a VBO using Compute-Shaders these days though.
But even better is to avoid of course. Not always possible, but foggy, smoggy, smokey, gassy particle substances can do the trick with "Pre-multiplied alpha blending", which doesn't care about the order. That term sounds terribly difficult, but a child can implement it. Step one is to activate blending (OpenGL code) like this:
...glEnable( GL_BLEND );
...glDisable( GL_ALPHA_TEST ); // <--- you can keep this one off
...glBlendFunc(GL_ONE, GL_ONE_MINUS_SRC_ALPHA); // out = src.rgb * 1 + dest.rgb * (1 - src.a)
Step two is to multiply your RGB color with its alpha value in your fragment shader:
...out.color.rgb *= out.color.aaa;
What just happened? Ordinary additive blending isn't always the right option. For bright fog or gasses maybe, but smog/smoke should actually darken the background pixels instead of just adding up. Pre-multiplied-Alpha blending mode can do both, as you can split up the blending effect. The amount of Alpha in your result, tells how much will remain of the original background colour. High alpha completely replaces the background with your new RGB colour, while a low alpha just adds your RGB to the existing background. Thus, dark smoke would use a high alpha value, dark RGB colour. A more transparent greyish fog would use a relative low alpha value.
What I liked in particular with this methods, asides being able to both darken and brighten using the same method, is that it doses much better than common additive blending. With particles, it's often unpredictable how many layers will overlap. It depends on random movement, and where the camera stands (inside/outside the volume, from which side it’s looking, etc). If your particle has an average brightness of 0.25, it makes quite a difference if there are 4 (4 x 0.25 = 1.0) or 8 (8 x 0.25 = 2.0) billboards placed in a row. In my case, it would always end up with either way too bright results, or barely visible particle clouds. Having the exact right dosis, was a matter of the camera being the right place at the right time. Luck. This method on the other hand doses much better.
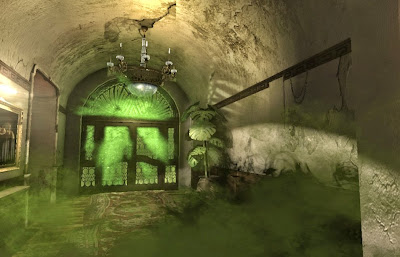
To demonstrate, I wanted dark greenish "fog" at the bottom. With normal additive blending, it would quickly turn chemical-bright green. With normal transparency on the other hand, I would get depth-sorting issues.
Ok. There is much more to tell about volumetric effects, because even with this cool add-on to the engine, there are still a lot of problems to solve. But let's call it quits for today. Fart. Out.

Rick, you have the best blog I've ever read. Thanks for sharing.
ReplyDeleteI've spotted two mistakes:
"Finding the good balance between quantity and is important." probably you've meant "quantity and quality"
And the other one...well I forgot;) Nothing important tho.
take care.
That's quite a compliment!!
ReplyDeleteI guess it should have been "quantity and size" or something. Usually I re-read the whole story before posting, and then later on one more time to filter out stupidity. But some typo's have stealth modus activated, and just blend in with the text. Anyway, it should be fixed :)
I agree with Soul Intruder that this blog has something that I feel some bosom thoughts. After a bit of analyzing, I realized that this is what I want to achieve. I'm also making an engine and a similar horror game with it. Personally I find every screenshot shown so far very inspiring. I'm like - "God, this is how my game should look and feel" I knew it subconsciously.
ReplyDeleteThanks! I hope we can deliver some more inspiring screenshots, although it would be very nice to get some environment-modelers here so we can produce interesting rooms on a higher tempo hehe
ReplyDelete